Showing posts with label patterns. Show all posts

Oct 11, 2010

PATTERN: Sun-Ray Slouch


Materials:
Hat A: Patons Silk Bamboo, approx 125 yards 
Hat B: Caron Country, approx 125 yards
Hook:  5 mm 
TIP: Some yarns, like bamboo blends, tend to produce a heavy fabric.  When using a heavy yarn like Patons Silk Bamboo, you may want to substitute a slightly smaller hook so that the weight of the yarn does not stretch the hat.  This is particularly true if you tend to crochet loosely.
Markers: one to mark each row and one to hold your stitch when you put your work down

Guage:
Hat A: 14 st x 12 rows = 4"
Hat B: 16 st x 12 rows = 4"


Stitches used (US terminology):
ch = chain
ea = each
hdc = half double crochet
sc = single crochet
sl st = slip stitch
st = stitch


Technique used:
Although crocheted using a hdc, the texture is created by inserting the hook under the back loop and the rear horizontal bar, resulting in the front loop as a bar running the width of the fabric that faces me when working [see the underside of this hat pictured below].  This side is the wrong side and will remain hidden. The reverse side, or the side facing away from you, creates a cool texture like a sideways garter stitch. It should be noted that the wrong side can actually be the right side when worked in sc for a hat, which creates an interesting texture as well.  Many thanks to coworker Rosanna for introducing me and my fellow Crochet Collaborators to this technique last year.


The pattern itself is quite simple to memorize.  The spiral ray is created by a "ch1-2hdc-ch1" separated by an increasing (or decreasing) number of hdc stitches.  The hat is crocheted continuously in the round rather than joining each row with a slip st and chaining 2 for the next row. Joining each round would create a unsightly seam that would interfere with the textured pattern.


INSTRUCTIONS


Ch 4, sl st to join, forming ring
Row 1: ch 2, 7 hdc in ring [8 st] 
TIP: Remember to keep the tail of the yarn to the right of all the hdc stitches as you add them.  This will make it easier to pull the ring closed.
Row 2: 2 hdc in ea st [16 st]
Row 3: *hdc in first st, 2 hdc in next st, * rep to marker [24 st]
Row 4: *hdc in first two st, 2 hdc in next st, * rep to marker [32 st]
Row 5: ch 1, sk hdc, *hdc, ch 1, sk next hdc, 2 hdc in next st, ch 1, sk next hdc, * rep to marker [40 st]
TIP: the 2 hdc in next st must be worked in the 2 hdc of previous row
Row 6: ch 1, sk ch, *hdc in next 2 st, ch 1, sk next ch, 2 hdc in next st, ch 1, sk next ch, * rep to marker [48 st]


TIP: when first working row 6, there may be some confusion as to where to insert the hook after the ch1-2hdc-ch1 stitch combo.  I had the same problem. Here is a picture of where to insert your hook. Note that when you finish the ch1-2hdc-ch1 combo, it looks like you have two chains, when in reality, there is only one. The best way I can describe what to do after the 2hdc is to insert your hook into the “chain” to the right of the first hdc of the row below.
        This is what it should look like: 


Row 7: ch 1, sk ch, *hdc in next 3 st, ch 1, sk next ch, 2 hdc in next st, ch 1, sk next ch, * rep to marker [56 st]
Row 8: ch 1, sk ch, *hdc in next 4 st, ch 1, sk next ch, 2 hdc in next st, ch 1, sk next ch, * rep to marker [64 st]
Row 9: ch 1, sk ch, *hdc in next 5 st, ch 1, sk next ch, 2 hdc in next st, ch 1, sk next ch, * rep to marker [72 st]
Row 10: ch 1, sk ch, *hdc in next 6 st, ch 1ch 1, sk next ch, 2 hdc in next st, ch 1, sk next ch, * rep to marker [80 st]
Row 11: ch 1, sk ch, *hdc in next 7 st,ch 1, sk next ch, 2 hdc in next st, ch 1, sk next ch, * rep to marker [88 st]
Row 12: ch 1, sk ch, *hdc in next 8 st, ch 1, sk next ch, 2 hdc in next st, ch 1, sk next ch, * rep to marker [96 st]
Row 13: ch 1, sk ch, *hdc in next 9 st,ch 1, sk next ch, 2 hdc in next st, ch 1, sk next ch, * rep to marker [104 st]
Rows 14-17: Repeat row 13  [104 st]
TIP: Hat should begin to curl up.  If it appears too flat, substitute sc for each hdc in row 17
Row 18: ch 1, sk ch, *hdc in next 3 st, hdc2tog in next st, hdc in next 4 st, ch1, sk ch, 2hdc in next st, ch 1, sk ch, * rep to marker [96 st]
Row 19: ch 1, sk ch, *hdc in next 3 st, hdc2tog in next st, hdc in next 3 st, ch1, sk ch, 2hdc in next st, ch 1, sk ch, * rep to marker [88 st]
Row 20: ch 1, sk ch, *hdc in next 2 st, hdc2tog in next st, hdc in next 3 st, ch1, sk ch, 2hdc in next st, ch 1, sk ch, * rep to marker [80 st]
Row 21: ch 1, sk ch, *hdc in next 2 st, hdc2tog in next st, hdc in next 2 st, ch1, sk ch, 2hdc in next st, ch 1, sk ch, * rep to marker [72 st]
Row 22:  *hdc in ch, hdc in ea hdc, * rep to marker [72 st]
Row 23: hdc in ea st [72 st]

BRIM
[TIP: If brim is too loose, change to a slightly smaller hook, such as a 4.00 mm or 4.5 mm hook]
Rows 24-27: repeat row 23 [72 st]
Row 28: sc in ea st to the last 3 st, sl st in last 3 st [72 st]
Bind off, weave in ends.


Jun 25, 2009

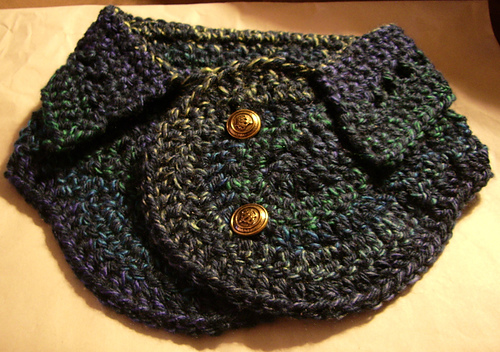
Pattern: Collared Tippet

Type: One Skein Wonder
Skill Level: Easy Skill Builder
Wearability: Fun


This scarf is militaristic in style with a pointed collar and round epaulets that form the front of the scarf. The look is finished with metallic buttons. Although the body is worked in a flat round without turning, the collar is worked by turning between rows.

Supplies

Yarn: Approximately 120 (100,80) yards of a DK (worsted, Bulky) weight of your choice. Just remember to pick something that feels good against the skin and isn't too rigid. For those comfortable with boucle style yarns, feel free. Just remember to use your stitch markers.

Hook: H or other to get gauge

Stitch markers

2 Buttons

TIP: Hate counting stitches over and over again? Keep your sanity by using stitch markers to mark the beginning and ending stitches for both sides of the base.

Gauge

Go ahead! Feel free to use a DK weight or a worsted/aran weight or even a bulky weight yarn. This pattern offers instructions for all three -- which is indicated by DK (Worsted, Bulky).

  • DK [3]: 16 dc + 10 rows = 4 in -- I used James Brett's Marble in Navy
  • Worsted/Aran [4]: 12 dc + 8 rows = 4 in -- I used Naturally Caron's Country in Teal
  • Bulky [5]: XX dc + X rows = 4 in -- I used Lion Brand Suede

TIP: Love how your swatch looks but can't make gauge? If changing your hook doesn't work (i.e., you don't like how the effect), try adapting the number of starting chains. Here's how: Given that the base of the scarf at the first row is 16 inches, multiply the number of dc stitches from your 4 inch gauge by 4 and then add 5. For example, if your swatch is 15 stitches = 4 inches, then chain 60 + 5 = 65 chains.

BODY

Ch 69 (53, XX).

Rnd 1: 2 dc in 4th ch from hook (counts as first dc); dc in each of next 64 (48, XX) ch, 6 dc in last ch; pivot (no turn) to work in free loops along opposite side of foundation ch, dc in each of next 64 (48, XX) ch, 4 dc in last ch; join with sl st in top of beg ch [124 (108, XXX) sts]

TIP: To help the scarf to lay flat, work stitches into the bump of the chain.

Rnd 2: Ch 3 (counts as first dc on each succeeding round), dc in same space as join, 2 dc in next dc, 4 dc in next dc, dc in next 64 (48, XX) dc, 4 dc in next dc, 2 dc in next dc, 3 dc in each of the next 2 dc, 2 dc in next dc, 4 dc in next dc, dc in next 64 (48, XX) dc, 4 dc in next dc, 2 dc in next dc; 3 dc in next 2 dc, 1 dc in next dc, join with sl st in top of beg ch [148 (132, 1xx) sts]

NOTE: The base of the scarf will always be the same width and is represented by those stitches which form the top and bottom straight edges of the scarf. In this pattern, these stitches are illustrated as "64 (48, XX)."

Rnd 3: Ch 3, 2 dc in next dc, (dc in next dc, 2 dc in next dc) 3 times, dc in next 64 (48, XX) dc, (2 dc in next dc, dc in next dc) 4 times, 2 dc in next two dc, (dc in next dc, 2 dc in next dc) 4 times, dc in next 64 (48, XX) dc, (2 dc in next dc, dc in next dc) 4 times, 2 dc in next two dc; join with sl st in top of beg ch [168 (152, 1xx) sts]

Rnd 4: Ch 3, dc in next dc, (2 dc in next dc, dc in next two dc) 3 times, 2 dc in next dc, dc in next 64 (48, XX) dc, (2 dc in next dc, dc in next two dc) 9 times, 2 dc in next dc, dc in next 64 (48, XX) dc, (2 dc in next dc, dc in next two dc) 5 times, 2 dc in next dc; join with sl st in top of beg ch [188 (172, 1xx) sts]

DK and Worsted weight only:

Rnd 5: Ch 3, dc in next dc, (2 dc in next dc, dc in next three dc) 3 times, 2 dc in next dc, dc in next 64 (48, XX) dc, (2 dc in next dc, dc in next three dc) 5 times, dc in next dc, (2 dc in next dc, dc in next three dc) 4 times, 2 dc in next dc, dc in next 64 (48, XX) dc, (2 dc in next dc, dc in next three dc) 5 times, dc in next dc, 2 dc in next dc, dc in next dc; join with sl st in top of beg ch [208 (192, 1xx) sts]

DK weight only:

Rnd 6: Ch 3, dc in next dc, (2 dc in next dc, dc in next four dc) 3 times, 2 dc in next dc, dc in next 64 (48, XX) dc, (2 dc in next dc, dc in next four dc) 5 times, dc in next dc, (2 dc in next dc, dc in next four dc) 4 times, 2 dc in next dc, dc in next 64 (48, XX) dc, (2 dc in next dc, dc in next four dc) 5 times, dc in next dc, 2 dc in next dc, dc in next dc; join with sl st in top of beg ch [228 (212, 1xx) sts]

Fasten off and weave in ends.

COLLAR

Row 1: Going to base stitches, work 1 sc in each stitch of base, ch 1, turn [64 (48, XX) sts]

Row 2: sc in first sc, 2 sc in next st, sc in remaining stitches until 3 st remain, 2 sc in next st, sc in last sc, ch 1, turn [66 (50, XX) sts]

Row 3: Repeat Row 2 [68 (52, XX) sts]

Row 4: Repeat Row 3 [70 (52, XX) sts]

Row 5: dc in first sc, sk next st, ch 1, 2 dc in next st, sk next st, ch 1, dc in next st, sk next st, ch 1, repeat to last three stitches, 2 dc in next st, sk next st, ch 1, dc in last st [72 (54, XX) sts]

Row 6: Repeat Row 4 [74 (56, XX) sts]

Row 7: Repeat Row 6 [76 (58, XX) sts]

Row 8: Repeat Row 7 [78 (60, XX) sts]

Fasten off and weave in ends.

FINISHING

Attach buttons to rounded epaulets, trying on to ensure proper placement.

copyright June 2009, Victoria Robinson

Mar 24, 2009

Great Minds and All That


OH. MY. GOD! I just discovered that the Triple Curve Stitch pattern I used for my Royal Lattice scarf is similar to the pattern crafted by Leigh Radford for her Blizzard Scarf (published in Scarf Style). A slightly modified version is the basis for Marianne Forrestal Airy Spring Throw profiled in the Mar/Apr 2009 issue of Crochet Today. Radford turned her scarf on its side, crocheting up the 84-inch long span to a 27-inch rise, while my scarf rises 44 inches up from an 11-inch base. Forrestal modified the vase-lie diamonds from which the curved stitches seem to spurt like a fountain by adding a v-stitch and integrating intermitten rows of double crochet in with the single crochet.

Although it appears all three scarves/shawls are based on the Triple Curve Stitch profiled in the Harmony Guide to Crocheting: Techniques and Stitches, each is finished very differently. Radford's features two rows of sc, while Forrestall goes quite fancy with a lacy scalloped edging. I opted for something in between with a mosaic border from a simple dc, ch1, 4dc cluster, ch1 repeat.

I'm generally satisfied happy with how my scarf turned out, despite the fact that blocking opens up the stitch pattern but looses the texture and springyness inherent in Paton's 70% bamboo/30% sik blend. It's just that 11 inches by 43 inches is just an awkward size for an open pattern stitch. I'm going to have to put it back among my works in progress until I can double it's size. More later about how I do that.

Mar 15, 2009

Vintage

I'm into vintage patterns these days. They seem to have so much more to offer in crochet, particularly when it comes to wearable fashion. Although not a fan of doilies -- using or making -- I see their construction as ways to improve my skills. They also can be modified to make some beautiful lace shawls. I also think I was hooked by the film noir look of the photos. The draw you right into the photo and straight to the item being featured. Today's photographers of contemporary crochet magazines should take a cue from vintage patterns such as these.

Here are a couple of my recent acquisitions:


Some pretty cool patterns include this Star-Stitch Crocheted Vest made from 990 yards of cotton thread size 5 and a #7 steel crochet hook.

Although I doubt I would make the acorn gadget as pictured, the acorns themselves are quite cute and would make interesting embellishments to a hat, or as buttons on a child's sweater.
These crochet gloves look quite snazzy and use about 320 yards of No 5 cotton crochet thread. I think I will add two columns of cables up the back for a little variety.

This Kids Sweaters booklet feature both knit and crochet patterns.


And of course I could not resist this little gem, as I look for ways to improve my basic knitting skills.
These patterns serve to reinforce what a crochet instructor taught me -- that crochet fabric can be quite supple when the right yarn and right hook are used. In this case, a fine gauge yarn (or thread) and a larger hook.

Mar 3, 2009

Update: Janetta lady's collar

Recently I was asked what knitting/ crochet pattern that I've worked that I could see myself making over and over and never get tired of. Well, I can see myself making Janetta's Lady's Collar again, because it is easily memorized, produces something that looks more complicated than it is, and dresses up an outfit with little effort. Here is a close-up of my third version of the collar, done up in a cashmere/silk blend that is luxuriously soft. I love how it feels against the skin and the solid cocoa brown is just the perfect accent with a light colored shirt (perhaps yellow ochre) and a brown suit. This one is a keeper for me. More photos of the collar can be found on Ravelry.

But could I make it over and over and over again, to the exclusino of anyting else? In a word, no. But I don't think that is the question. I would answer that there are several patterns I can see myself making repeatedly and actually do -- simple cloches adorned with buttons [my trademark], baby bibs, neck warmers, and perhaps one day, socks.