Oct 26, 2010

Crochet: No Longer the Ugly Step-Sister


I've always thought Crochet was a beautiful craft worthy of a hell of a lot more respect than what it typically receives.  Unfortunately, it has taken a back seat to it's traditionally more glamorous sister, Knitting.

If fiber arts were a fairy tale, then crochet would be Cinderella.  For decades, crochet was kept close to the cinders, forced to do all the housework, what with doilies, washcloths, lace edgings, and bedspreads. Occasionally, our sensible craft was allowed out, moving beyond the house to garments.  But rarely was she invited to the ball.  But, times have changed.  Cindy Crochet isn't waiting to be invited to the ball, although she is getting more invitations.

What is old is new again
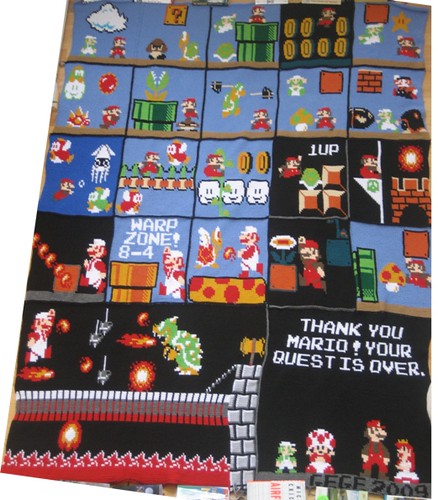
Take a look at what new old techniques have done for traditional home crafts.    Tunisian crochet has transformed washcloths and afghans and now lace shawls.  Kim Guzman is quite the whiz with the 16 inch hook.  GeGe Crochet's Super Mario Brothers Super Blanket (above) is an amazing piece of work, at approximately 5 ' by 9'.  Can you believe the detail?

"Young Man, are you sure you are trying it on the right foot?"
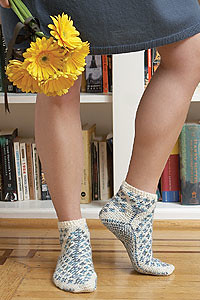
Crochet has left the comfort of utilitarian household goods and taken her act on the road.  First, the socks.  Socks are coming out of the woodwork much in the same way that the forest animals reached out to Cinderella.  Check out these Troubadur Socks by Danielle Kassner (pattern published in Interweave Crochet Spring 2008).   Crochet also is great for elaborate cuffs.  Just be warned -- go for the fingering weight yarn -- DK and sport weight is more appropriate for crocheted socks for boots.


Great sweaters accentuate the wearer's body.  Gone are the days of stiff knotted fabric better suited for washcloths and afghans.  Julia Vaconsin has applied her knowledge of yarn and drape gained from her knitting to her crochet, creating beautiful garments like this Butterscotch cardigan.  Julia's published designs can be found on her blog which is written in both English and French.

A dream is a wish your heart makes
Those of us who have toiled for so long at our craft, who have faithfully dreamt of being welcome at the fiber artists ball, are happy to see others appreciate crochet for what it is and what it can be.  There are no limits (well just a few waiting for someone to work out the kinks).  The best news is that the various crochet magazines are starting to recognize that for the craft to attract new devotees, they must
provide updated, contemporary patterns that use all weights and types of yarns. 

Let's not wait for our Fairy Godmother to wave her magic wand.  Climb aboard and get designing.

Oct 19, 2010

Mulled Over Yarn


Just a quick post about a hat I completed yesterday.  Actually, this post is about the yarn -- Mister Joe Sangria, a mohair-nylon-wool blend yarn that I had received in a swap about two years ago.

First, the hat, named Mulled Winne Toque after the yarn colorway.  I chose to make a simple skull cap that fits loosely about the head.  This toque, which is a hat with a narrow brim or no brim at all, is shaped wide at the top, sits loosely about the head, and then evokes the curve of the crown by narrowing slightly at the brim for a secure fit.  I only had the one ball and it took exactly one ball to make.  When I finished the last row, I had three inches left to weave in.  Talk about cutting it close.  The pattern will be posted soon.

Now the yarn.  Mister Joe Sangria is a self-striping yarn, featuring two colors with similar hues.  A third stripe of shiny white (likely the viscose rayon) wrapped around the mohair/wool/acrylic strand provides random pops of color.  Personally, I don't like it.  It looks like the remains of bird droppings at worst and dried paint at best.  My sister says the white looks like the remains of melting snow.  But hey, I'm not the paragon of fashion.  My two teen self-proclaimed fashionistas love the dashes of white.  Go figure.

The specs for Mister Joe Sangria are below.  One would think that a yarn with 60% mohair-wool would be soft to the touch.  Sadly, Mister Joe is quite crunchy to the touch and a bit stiff from the tight ply with the acrylic rayon.  However, despite its crunchiness, the yarn is just a tad scratchy when you run your hand over the fiber halo that is typical to mohair yarns.  Perhaps the crunchiness will go away with washing.

Would I use this yarn again?  Not very likely, unless I receive it as a gift, again.

Fibre Content:53% Mohair/ 22% Acrylic/ 18% Viscose Rayon/ 7% Wool
Made in:Italy
Care:Hand Wash/ Dry Flat
Gauge:14 st/4 inches 6.0 mm (US 10)
Yardage:100 m (109 yards)
Size50g (1.75 oz) ball

Oct 11, 2010

PATTERN: Sun-Ray Slouch


Materials:
Hat A: Patons Silk Bamboo, approx 125 yards 
Hat B: Caron Country, approx 125 yards
Hook:  5 mm 
TIP: Some yarns, like bamboo blends, tend to produce a heavy fabric.  When using a heavy yarn like Patons Silk Bamboo, you may want to substitute a slightly smaller hook so that the weight of the yarn does not stretch the hat.  This is particularly true if you tend to crochet loosely.
Markers: one to mark each row and one to hold your stitch when you put your work down

Guage:
Hat A: 14 st x 12 rows = 4"
Hat B: 16 st x 12 rows = 4"


Stitches used (US terminology):
ch = chain
ea = each
hdc = half double crochet
sc = single crochet
sl st = slip stitch
st = stitch


Technique used:
Although crocheted using a hdc, the texture is created by inserting the hook under the back loop and the rear horizontal bar, resulting in the front loop as a bar running the width of the fabric that faces me when working [see the underside of this hat pictured below].  This side is the wrong side and will remain hidden. The reverse side, or the side facing away from you, creates a cool texture like a sideways garter stitch. It should be noted that the wrong side can actually be the right side when worked in sc for a hat, which creates an interesting texture as well.  Many thanks to coworker Rosanna for introducing me and my fellow Crochet Collaborators to this technique last year.


The pattern itself is quite simple to memorize.  The spiral ray is created by a "ch1-2hdc-ch1" separated by an increasing (or decreasing) number of hdc stitches.  The hat is crocheted continuously in the round rather than joining each row with a slip st and chaining 2 for the next row. Joining each round would create a unsightly seam that would interfere with the textured pattern.


INSTRUCTIONS


Ch 4, sl st to join, forming ring
Row 1: ch 2, 7 hdc in ring [8 st] 
TIP: Remember to keep the tail of the yarn to the right of all the hdc stitches as you add them.  This will make it easier to pull the ring closed.
Row 2: 2 hdc in ea st [16 st]
Row 3: *hdc in first st, 2 hdc in next st, * rep to marker [24 st]
Row 4: *hdc in first two st, 2 hdc in next st, * rep to marker [32 st]
Row 5: ch 1, sk hdc, *hdc, ch 1, sk next hdc, 2 hdc in next st, ch 1, sk next hdc, * rep to marker [40 st]
TIP: the 2 hdc in next st must be worked in the 2 hdc of previous row
Row 6: ch 1, sk ch, *hdc in next 2 st, ch 1, sk next ch, 2 hdc in next st, ch 1, sk next ch, * rep to marker [48 st]


TIP: when first working row 6, there may be some confusion as to where to insert the hook after the ch1-2hdc-ch1 stitch combo.  I had the same problem. Here is a picture of where to insert your hook. Note that when you finish the ch1-2hdc-ch1 combo, it looks like you have two chains, when in reality, there is only one. The best way I can describe what to do after the 2hdc is to insert your hook into the “chain” to the right of the first hdc of the row below.
        This is what it should look like: 


Row 7: ch 1, sk ch, *hdc in next 3 st, ch 1, sk next ch, 2 hdc in next st, ch 1, sk next ch, * rep to marker [56 st]
Row 8: ch 1, sk ch, *hdc in next 4 st, ch 1, sk next ch, 2 hdc in next st, ch 1, sk next ch, * rep to marker [64 st]
Row 9: ch 1, sk ch, *hdc in next 5 st, ch 1, sk next ch, 2 hdc in next st, ch 1, sk next ch, * rep to marker [72 st]
Row 10: ch 1, sk ch, *hdc in next 6 st, ch 1ch 1, sk next ch, 2 hdc in next st, ch 1, sk next ch, * rep to marker [80 st]
Row 11: ch 1, sk ch, *hdc in next 7 st,ch 1, sk next ch, 2 hdc in next st, ch 1, sk next ch, * rep to marker [88 st]
Row 12: ch 1, sk ch, *hdc in next 8 st, ch 1, sk next ch, 2 hdc in next st, ch 1, sk next ch, * rep to marker [96 st]
Row 13: ch 1, sk ch, *hdc in next 9 st,ch 1, sk next ch, 2 hdc in next st, ch 1, sk next ch, * rep to marker [104 st]
Rows 14-17: Repeat row 13  [104 st]
TIP: Hat should begin to curl up.  If it appears too flat, substitute sc for each hdc in row 17
Row 18: ch 1, sk ch, *hdc in next 3 st, hdc2tog in next st, hdc in next 4 st, ch1, sk ch, 2hdc in next st, ch 1, sk ch, * rep to marker [96 st]
Row 19: ch 1, sk ch, *hdc in next 3 st, hdc2tog in next st, hdc in next 3 st, ch1, sk ch, 2hdc in next st, ch 1, sk ch, * rep to marker [88 st]
Row 20: ch 1, sk ch, *hdc in next 2 st, hdc2tog in next st, hdc in next 3 st, ch1, sk ch, 2hdc in next st, ch 1, sk ch, * rep to marker [80 st]
Row 21: ch 1, sk ch, *hdc in next 2 st, hdc2tog in next st, hdc in next 2 st, ch1, sk ch, 2hdc in next st, ch 1, sk ch, * rep to marker [72 st]
Row 22:  *hdc in ch, hdc in ea hdc, * rep to marker [72 st]
Row 23: hdc in ea st [72 st]

BRIM
[TIP: If brim is too loose, change to a slightly smaller hook, such as a 4.00 mm or 4.5 mm hook]
Rows 24-27: repeat row 23 [72 st]
Row 28: sc in ea st to the last 3 st, sl st in last 3 st [72 st]
Bind off, weave in ends.